Search This Blog

Saturday 24 November 2012

HOW TO CONNECT TO A WIRELESS NETWORK (Windows Vista)


HOW TO CONNECT TO A WIRELESS NETWORK (WINDOWS VISTA)


1.    Click on the cross in the bottom right corner of the screen. From the menu that appears, click on ‘Connect to a network’.


1.    In the new window that appears, click on the name of the network to connect to, and then click on ‘Connect’.


3.    Unless the network is unsecured, a prompt for a ‘security key or passphrase’ will appear. The password should be supplied by the operator of the wireless network. Type in the password, then click on ‘Connect’.


4.    After a few seconds, the connection should be established. Click the ‘Close’ button to complete the process.


Tuesday 20 November 2012

Change Desktop To Plain Background (Windows Vista)

How To: Change Desktop To Plain Background (Windows Vista)


1. Right click on a blank space on the desktop. From the menu that appears, left click on 'Personalize'.


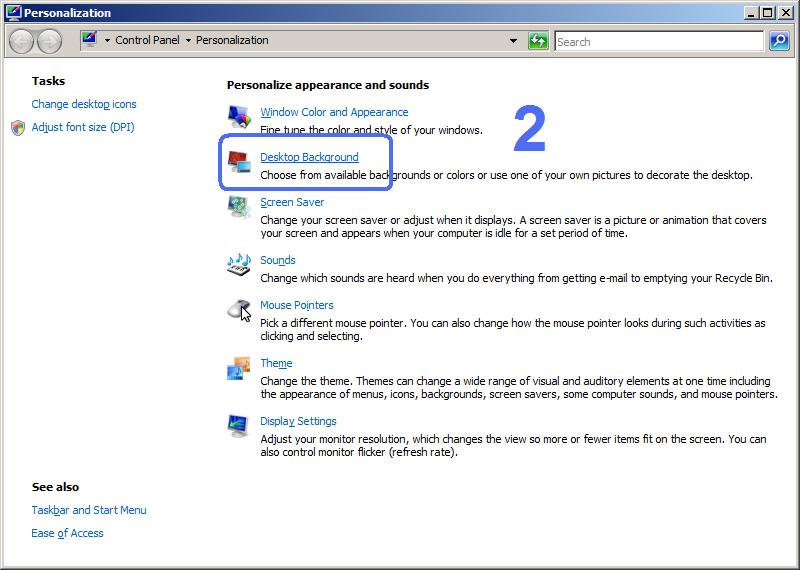
2. In the new window that appears, click on 'Desktop Background'.


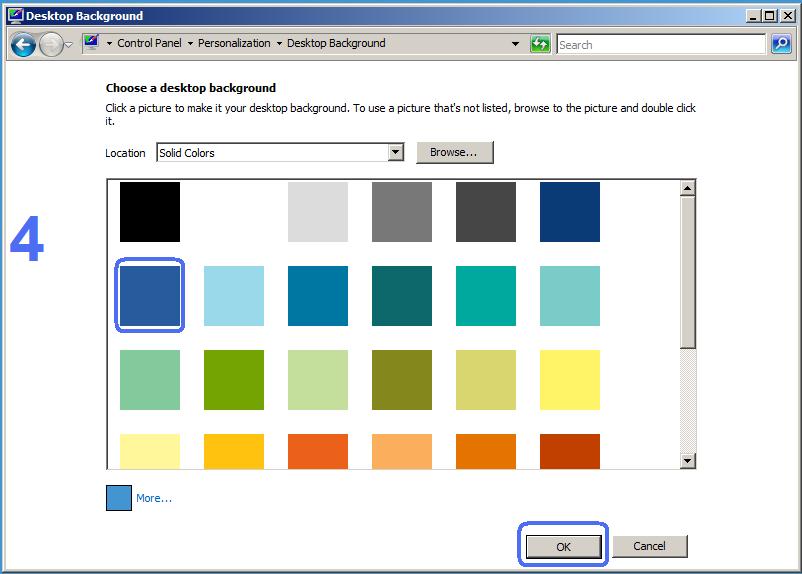
3. Click on the drop down arrow to the right of 'Location'. From the menu that appears, click on 'Solid Colors'.


4. Click on an appropriate colour, then click on 'OK'.

5. Click on the 'X' in the top right corner of the window to return to the desktop.

Setup Gmail in Windows Live Mail

How to: Setup Gmail in Windows Live Mail


1. Within Windows Live Mail, click on the blue square in the top left corner of the screen. From the menu that appears, point to 'Options'. From the menu that extends to the right, click on 'Email accounts...'.


2. Click on the 'Add' button on the right of the new window that appears.


3. Click on 'Email Account', then click 'Next'.


4. Fill out the form that appears as follows:
  • Click in the 'Email address' box and type in your full Gmail address (e.g. someone@gmail.com)
  • Click in the 'Password' box and type in your Gmail password (this is case sensitive)
  • Click in the box below 'Display name for your sent messages' and type in your name as you want it to appear on the recipients computer.
  • Tick the box marked 'Manually configure server settings'.
  • Click on 'Next'


5. Fill out the next form that appears as follows:

  • Click in the 'Server address' box under the 'Incoming server information' heading and type in 'pop.gmail.com'.
  • Tick the box marked 'Requires a secure connection (SSL)'.
  • Click in the 'Server address' box under the 'Outgoing server information' heading and type in 'smtp.gmail.com'
  • Click in the 'Port' box to the right of the outgoing server address and type in '465'.
  • Tick the boxes under the outgoing server address marked 'Requires a secure connection (SSL)' and 'Requires authentication'.
  • Click on 'Next'.


6. Click on 'Finish', then click 'Close' to complete the process.


Monday 19 November 2012

General Virus Removal Process

General Virus Removal Process

Many viruses can be removed by restoring the computer to an earlier time using the following procedures. This guide was written for Windows XP but the steps for Windows Vista and 7 and very similar

1. If the computer is currently on, turn it off by pressing and holding the power button for ten seconds. Wait a further ten seconds and turn the computer back on again.

2. After the initial boot-up screen disappears but just before the Windows logo appears, repeatedly tap the 'F8' key on the keyboard. A menu should appear titled 'Windows Startup Menu'. If the Windows logo appears instead, repeat steps one and two until the menu is displayed.

3. Use the arrow keys on the keyboard to highlight 'Safe Mode', then press the enter key. You might have to press enter again to select your version of Windows. Some unusual messages will appear on the screen.

4. When the computer starts, click on your user account name to log into Windows.

5. Click on the 'Start' button in the bottom left corner of the screen. From the menu that appears, point to 'All Programs'.

6. From the menu that extends to the right, click on 'Accessories'.

7. From the 'Accessories' menu that is now shown, click on 'System Tools', then right click on 'System Restore'. From the menu that appears, left click on 'Run as Administrator'. If this option does not appear, left click on 'System Restore' instead. A new window will then appear (it can take a couple of minutes to appear).

8. Click on the 'Next' button

9. Click on the dot marked 'Choose a different restore point', then click 'Next'.

10. Choose a time to restore the computer back to. This should be a time when the computer was working normally.

11. Click on 'Next', then click 'Finish' to complete the process. The computer will shut down, restore the settings to the time chosen in step six, then restart.


If this does not work, try the following:


1. If the computer is currently on, turn it off by pressing and holding the power button for ten seconds. Wait a further ten seconds and turn the computer back on again.

2. After the initial boot-up screen disappears but just before the Windows logo appears, repeatedly tap the 'F8' key on the keyboard. A menu should appear titled 'Windows Startup Menu'. If the Windows logo appears instead, repeat steps one and two until the menu is displayed.

3. Use the arrow keys on the keyboard to highlight 'Safe Mode with Command Prompt', then press the enter key. You might have to press enter again to select your version of Windows. Some unusual messages will appear on the screen.

4. If a list of user accounts appears, click on your user account name to log into Windows.

5. A black box with white writing should appear. Type in %systemroot%\system32\restore\rstrui.exe and press enter.

6. System Restore should now appear on the screen. Click on the 'Next' button to begin the restore process.

7. Click on the dot marked 'Choose a different restore point', then click 'Next'.

8. Choose a time to restore the computer back to. This should be a time when the computer was working normally.

9. Click on 'Next', then click 'Finish' to complete the process. The computer will shut down, restore the settings to the time chosen in step six, then restart.


Wednesday 7 November 2012

Cannot start MP Navigator Ex

Cannot start MP Navigator Ex

I was recently called to a customer's house to setup a new Canon PIXMA MG5150 multi-function printer. The installation went well and soon enough, the machine produced a high quality test print. I was even able to share the printer with a Windows 7 netbook with no real trouble (there is no WiFi on this model), although it seemed to take a while to download and install the correct driver.

What didn't go so well was testing the scanning function. Whilst the machine would copy with no problems, and would scan through the Windows 'Fax and Scan' program, the 'MP Navigator Ex' software that came on the installation CD simply wouldn't load. No error messages appeared but nothing would come up on the screen when the icon was clicked. In addition, the 'scan' button on the device had no effect at all.

I tried the usual steps of uninstalling and reinstalling the software and also downloading and installing the latest version of both the driver and the 'MP Navigator Ex' software from the Canon website but this made no difference.

After a long time, I eventually discovered the fault: There was a conflict between the software for the customer's previous scanner software (a Dell multifunction) and the new Canon software.

Although I thought I had removed all the software for the device the Canon was replacing, there was a remnant left over that was stopping 'MP Navigator Ex' from starting correctly.

The problem was located in the folder 'C:\Windows\System32\twain32' Viewing of hidden / system files needs to be activated for this folder to show in 'My Computer' or 'Windows Explorer'.

It appears that this folder contains a sub-folder for every scanner device installed on the system. In this case, there were two folders: One for the Canon PIXMA device I had just installed and one for the old Dell. I tried to delete the Dell folder but got an error message as a file within the folder was in use.

I discovered through 'Task Manager' that each time I had double clicked on the 'MP Navigator Ex' icon, a new instance of the program executable had been loaded. After I had used 'End Task' to close each instance of 'mpnex40.exe', I was finally able to delete the 'Dell' folder.

As soon as I did this, the program opened with no trouble at all and the scanner functions worked normally, including the 'scan' button on the machine itself.


Tuesday 6 November 2012

FREE VPN Solution

If you ever have an odd but specific problem with the Internet, it can be worth trying to same activity with a different Internet connection.

For example, if downloading from one particular site is very slow, or E-Mail suddenly becomes unreliable, the cause may not be with your machine. It could be caused by bad routing between your Internet provider and the service you are trying to access.

Unfortunately, the approach of trying a different Internet connection is not always possible. This is where a VPN comes in.

VPN stands for 'Virtual Private Network' and allows you to route your Internet traffic through a different provider. If the same fault disappears when your machine is connected to a VPN, then the source of the problem is very likely down to a fault with your Internet Service Provider (ISP).

VPN services are run by companies that normally charge a fee for access. In general, an Internet connection will work more slowly when running through a VPN because the traffic has to be routed through more systems.

The quality and speed of VPN services varies and many have restrictions on what the connection can be used for. Many do not allow P2P downloads, for example.

One service I have found very useful whilst diagnosing problems for clients is called 'Best UK VPN'. Its completely free, does not require registration and is easy to set-up. I haven't measured the speed whilst connected but it certainly works adequately for testing purposes. Indeed, websites appear to load as quickly as when connected without the VPN. 

http://www.bestukvpn.com/

Sunday 4 November 2012

The installer encountered errors before iTunes could be configured

Are you familiar with the following message?


'The installer encountered errors before iTunes could be configured.
Errors occurred during installation. Your system has not been modified.
Please run the installer again, or click Finish to exit'.

Quite clearly, a technical problem occurred during the installation of iTunes and the process could not be completed. Without more information, it is impossible to say exactly what caused the problem.

In most cases of this type of error, a complete un-installation of all Apple software before downloading the latest installation package and trying again does the trick. This process includes:

  • Un-installing all Apple related components through the 'Add or Remove Programs' utility in the Windows control panel.
  • Removing remnants from the 'Program Files' folder and registry.
  • Clearing out the temporary folders.
  • Restarting the computer and reinstalling.


On this particular occasion, this procedure didn't work. The installation of iTunes rolled back time and time again and resulted in the error above.

Using the logging facilities built into the Windows installer, I was able to identify the problem was with the installation of one of the iTunes components, Apple Mobile Device. Essentially, a device driver for USB connectivity to Apple hardware was failing to install.

I then tried installing the 'Apple Mobile Device' module on its own. Using Winrar, it is possible to extract the iTunesSetup.exe file and install each part separately. The following YouTube video was very useful for this:


Unfortunately this did not work either and the 'Apple Mobile Device' module could not be installed separately either. 

Eventually I was able to trace the problem to a single registry key: HKEY_LOCAL_MACHINE\SOFTWARE\Microsoft\Windows\CurrentVersion\DIFx\DriverStore

On the particular machine I was working on, accessing this key simply resulted in an error. It seems the permission settings for this key had become corrupt.

I was able to resolve the problem by performing these steps:

  1. Right clicking on the 'DriverStore' key, then clicking 'Permissions'.
  2. Clicking on 'Add', then typing in 'SYSTEM' in the new panel that appeared before clicking 'OK'.
  3. Clicking on the 'SYSTEM' object I had just added, then ticking the 'Full Control' box and clicking 'OK'.
After rebooting the system I was able to reinstall iTunes successfully.

I would be interested to hear if anyone else has had the same problem and if they were able to resolve it.